
Request an Appointment

BY PHONE


Unlike, running, swimming, and walking; cycling is one of the unique sports where your body interacts with a piece of equipment to perform the activity. If the connection between bike and rider is correct, the results can be excellent. If, on the other hand, something is wrong it can lead to poor performance, discomfort, and eventual injury. This article will take you through the basics of bike fitting and show you five exercises you can do to improve your bike fit. We will focus on road bikes in this article, but this principle will transfer to other forms of cycling as well.
Bike Fitting Basics
You interact with your bicycle in three spots: the saddle, pedals and your handlebars. Each of these contact points can be optimized to allow for a more enjoyable and effective ride. These are the basic principles you want to focus on when looking to improve your bike fit. Contact a licensed bike fitter or rehabilitation professional if you have a pre-existing injury or condition that may require deviation from these general guidelines.
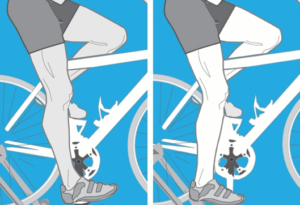
Cleat/Foot Placement On Your Pedal
Whether you’re using clipless pedals (those with cycling-specific shoes that “click” into place) or platform pedals (standard flat pedals) and running shoes, you need to make sure your foot is properly positioned. First, you need to make sure that the midline of your foot is perpendicular to the pedal. If you’re significantly off in either direction, this can lead to lower limb pain and potential injury. Next, you’ll need to position the ball of your foot in the center of the pedal, directly over the point where it pivots. If you have clipless pedals, simply secure the cleat over the ball of your foot and clip into the pedal.

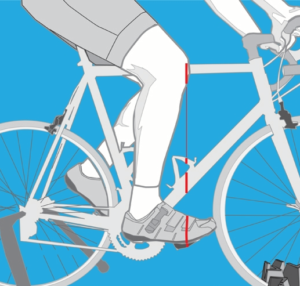
How To Find The Right Saddle Height
To check your saddle height at home, sit on your saddle with your hips level to the ground and place your heel on the pedal. Your saddle should be high enough that when you reach the lowest part of the pedal stroke, your knee is fully extended. To check this, place the ball of your foot (see above) on the pedal and you should see a 30-degree bend at your knee at the bottom of the stroke (check this using a protractor app). The other way to check your measurements is to look at your hips when you’re riding. If they’re rocking side-to-side, your fit is off and you may need to raise or lower your seat slightly until they are steady.
How to Find The Right Fore/Aft Saddle Position
Once you’ve established your saddle height – it’s time to adjust the forward/backward location of your saddle. You’ll need a string with a small weight (a few washers will do) attached to one end and a camera or a friend to look at your alignment for you. With your foot on your pedal at the 3 o’clock position, hold the un-weighted end of the string at your knee cap with the weighted end hanging towards (but not touching) the ground. Move your seat horizontally until the string is in line with the middle of your pedal when viewed from the side.
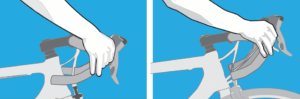
How to Find The Perfect Handlebar Position
The adjustment of your handlebars relies mostly on a combination of comfort and performance rather than a scientific formula or rule of thumb. Higher positioned handlebars tend to provide a more comfortable riding experience, but they also make you a “bigger target” for the wind. Lower (or “slammed” – use this if you want to use some jargon during your next group ride) handlebars can help you glide through the wind but may also be more uncomfortable. So which is right for you? If comfort and scenery watching is more important than speed, go with the taller position and enjoy a comfortable ride. If, on the other hand, you want to go fast, start with your handlebars at the level of your seat and gradually lower them over time. Lowering the height too aggressively can lead to unnecessary discomfort.
Exercises to Improve Your Bike Fit
Up to this point, we’ve explained how to adjust your bike to better fit you. Does the fact that your bicycle is adjusted properly mean it is the most optimal fit? The short answer is no. Many people (especially those of us working desk jobs) have muscle imbalances that lead to suboptimal positioning on the bike. Here are 5 exercises you can do to increase both your strength and mobility to improve your bike position over time.
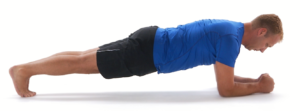
Plank
- Prop yourself up on your forearms and toes, with your chin tucked in.
- Lift up your body, creating a straight line with your body.
- Maintain the position without arching the lower back
- 8 repetitions of 30 seconds (work your way up to 4 sets of 1 minute)
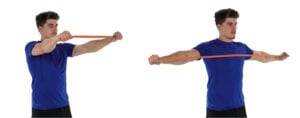
Band Pull Aparts
- Stand with the arms in front of you and holding a band between your hands.
- With the band already taut in the starting position, move the arms horizontally backward with the palms facing down.
- Return to the starting position and repeat.
- Keep the chin neutral during the exercise and always do this exercise with a controlled movement.
- Perform 3 sets of 20 repetitions
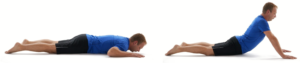
Lumbar Extensions
- Lie on your stomach with your hands next to your face.
- Push up with your arms and lift gradually your head then your upper back all the way to your lower back keeping the glutes relaxed and your pelvis against the ground.
- Push up until you feel a small discomfort in the lower back lower yourself and repeat.
- Repeated 10 repetitions every 2 hours
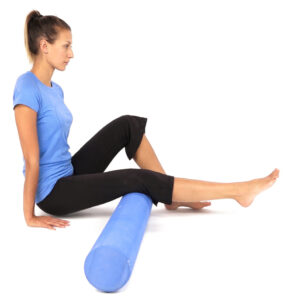
Hamstring Self Release
- Place a foam roller on the floor and sit on the floor supporting yourself with your hands.
- Place the back of one thigh over the foam roller and the other leg on the floor for support.
- Roll the entire back of your thigh from the bottom of the buttock to your knee in an up and down motion.
- Maintain your abs tight and proper low back posture during the exercise.
- Perform 2-3 minutes per leg
Kneeling Hip Flexor Stretch
- Kneel on one knee creating a 90° angle with the opposite hip and use a chair for support.
- Tilt your pelvis backward to flatten your lower back and transfer your weight forward until you feel a gentle stretch on the anterior aspect of your hip of the lower leg.
- Maintain the position and relax.
- Maintain your upper body upright and your lower back flat (not arched).

Cycling has jumped in popularity in the last several years, and with good reason. It’s good for you, fun and a great way to spend time outside with friends. Make sure you’ve got a proper fit and you’re preparing your body appropriately for the activity and you’re well on your way. If you have any questions about bike fit or are looking to improve your cycling performance through exercise and rehabilitation, we would be happy to help.
Photos courtesy of Physiotec and BikeFit.
Cycling Apps
We review the Best Indoor Cycling Apps and Workouts.
Click here to learn more!


Questions? We're happy to help!
Choosing the right service provider can be a big decision. We’re dedicated to answering any questions you have to help you make the best choice. Contact us today and ask us anything!
Call us at (416) 238-6749